IronMQ Push Queues Reference
Table of Contents
Overview
Blog Post for Overview. You should also review the MQ API for push queue related endpoints.
Subscribers
Subscribers are simply URL’s that IronMQ will post to whenever a message is posted to your queue. There are currently three types of subscribers supported, all differentiated by the URL scheme (first part of the URL):
- HTTP endpoints: urls with the http or https prefix for instance, http://myapp.com/some/endpoint or https://myapp.com/some/endpoint. WARNING: Do not use the following RFC 3986 Reserved Characters within your in the naming of your subscriber endpoints.
- IronMQ endpoints: IronMQ endpoints point to another queue on IronMQ. Use these to do fan-out to multiple queues. More info on the IronMQ URL format below.
- IronWorker endpoints: IronWorker endpoints will fire up an IronWorker task with the message body as the payload. More info on the IronWorker URL format below.
Iron.io URL Formats
The basic formats are similar to any other URL:
ironmq://[{ProjectID}:{Token}@[{Host}[:{Port}]]]/{QueueName}

ironworker://{ProjectID}:{Token}@{Host}[:{Port}]/{CodeName}
Here are some examples:
- ironmq:///receiver-queue - refers to the queue named “receiver-queue” in the same project.
- ironmq://ProjectId:Token@/QueueName - refers to the queue named “QueueName” in a different project on same region/cloud.
- ironmq://ProjectId:Token@mq-rackspace-dfw.iron.io/MyQueue - refers to the queue named “MyQueue” on a different region/cloud.
- ironworker://ProjectId:Token@worker-us-east.iron.io/myWorker - refers to a worker on IronWorker called “MyWorker”.
Push Queue Settings
To create a push queue, POST to your queue endpoint with the following parameters:
subscribers- required - an array of hashes containing subscribers. eg:{"name": "my-subscriber", "url": "http://myserver.com/endpoint"}. WARNING: Do not use the following RFC 3986 Reserved Characters in the naming of your subscriber endpoints (URLs)
! * ' ( ) ; : @ & = + $ , / ? # [ ]
type- multicast or unicast. Default is multicast. Set this to ‘pull’ to revert back to a pull queue.retries- number of times to retry. Default is 3. Maximum is 100.retries_delay- time in seconds between retries. Default is 60. Minimum is 3 and maximum is 86400 seconds.error_queue- the name of another queue where information about messages that can’t be delivered after retryingretriesnumber of times will be placed. Pass in an empty string to disable error queue. Default is disabled. The default queue type for an error queue will be a pull queue. See Error Queues section below.
Queueing Messages
This is the same as posting any message to IronMQ. Here is a curl example to post a message to the queue:
You should get a curl response that looks like this:
Retries
IronMQ will automatically retry if it fails to deliver a message. This can be either a connection error, an error response (eg: 5xx), or any other scenario that does not return 2xx response. The behavior is a bit different depending on whether it’s unicast or multicast as follows:
- multicast treats each endpoint separately and will try each endpoint once per retry. If one endpoint fails, it will retry that single endpoint after retries_delay, it won’t retry endpoints that were successful.
- unicast will try one endpoint in the set of subscribers. If it succeeds, that message is considered delivered. If it fails, a different endpoint is tried immediately and this continues until a successful response is returned or all endpoints have been tried. If there is no successful response from all endpoints, then the message will be retried after retries_delay.
Error Queues
Error queues are used to get information about messages that we were unable to deliver due to errors/failures while trying to push a message.
To create an error queue
Post to your push queue a message with the “error_queue” option defined.
If a push queue is set with the error_queue parameter, then after the set number of retries, a message will be put in the named error queue and viewable via your account dashboard. By default, the error queue will be a pull queue.

NOTE: An error queue will not appear in your dashboard until an initial error message is received.
The error queue message will contain the following information:
{
  "source_msg_id": "5924620498196814694",
  "body":"SOURCE_MESSAGE_BODY_HERE",
  "headers":{
    "USER_AGENT":"YOU",
    "OTHER_HEADERS":"HERE"
  },
  "subscribers": [
    {
      "name": "my-subscriber",
      "url": "http://thiswebsitewillthrowanerror.com",
      "code": 500,
      "msg": "Internal server error."
    }
  ]
}
You can look up the original message if needed via the GET message endpoint using
the source_msg_id value.
To turn off/disable an error queue
Post to your push queue set the error queue option to an empty string. ex: “error_queue”: “”.
NOTE: Ommitting the “error_queue” option will not disable the error queue.
Checking Status
If you want the detailed status of the delivery to each of your subscribers, you can check that too. In the curl example below, you’ll need to exchange MESSAGE_ID with the id that was returned in the response above when you posted a message.
This should return a response like this:
How the Endpoint Should Handle Push Messages
These are the things the endpoint that is receiving the push should know about.
Push messages’ bodies will be sent to endpoints as is (strings) as POST request body. To obtain message’s body just read request body.
The receiving endpoint must respond with a 200 or 202 if they have accepted the message successfully.
Response Codes
- 200 - message is deleted / acknowledged and removed from the queue.
- 202 - message is reserved until explicitly deleted or the timeout is exceeded. See 202 section below.
- 4XX or 5XX - the push request will be retried.
Timeout
If an endpoint doesn’t respond within timeout, it’s marked as failed/error and will be retried.
Default timeout is 10 seconds.
If you’d like to take more time to process messages, see 202 section below.
Long Running Processes - aka 202
If you’d like to take some time to process a message, more than the 10 second timeout, you must respond with HTTP status code 202.
Be sure to set retries_delay’s value to the maximum amount of time you’d like your processing to take.
If you do not explicitly delete the message before the timeout has passed, the message will be retried.
To delete the message, check the Iron-Subscriber-Message-Url header and send a DELETE request to that URL.
Push Queue Headers
Each message pushed will have the following special headers as part of the HTTP request.
Only User-Agent and Content-Type headers may be overwritten
by subscriber or push headers, the others are always set by push queues.
User-Agent-IronMQ Pusherd(default, may be overwritten by subscriber or message headers)Content-Type-text/plain; encoding=utf-8(default, may be overwritten by subscriber or message headers)Iron-Message-Id- The ID for your original message allowing you to check the statusIron-Reservation-Id- The ID of a message reservation. If client respond with 202, it will be valid “retries_delay” seconds.Iron-Subscriber-Name- A name of the particular subscriber.Iron-Subscriber-Message-Url- A URL to delete/acknowledge the message. Generally used with the 202 response code to tell IronMQ that you’re done with the message. Send a DELETE http request to this URL to acknowledge it.
Encryption and Security
When you are using your private API as subscriber and want to secure connection to IronMQ you are able to use HTTPS endpoints.
https://subscriber.domain.com/push/endpoint
Also, if you want some kind of authentication you can use various standards for authorization with tokens. Like OAuth or OpenID. In this case, specify a token in your subscriber’s URL.
https://subscriber.domain.com/push/endpoint?auth=TOKEN
Another possibility to specify a token is put it to your messages’ bodies and parse it on your side. In this case a token will be encrypted by SSL/TLS.
Important Notes
- Queue type is static.
- Do not use the following RFC 3986 Reserved Characters in the naming of your subscriber endpoints.
Troubleshooting Push Queues
Push queues are extremely powerful but do not by default give insight on what happens to your message once it leaves queue. Did it hit the endpoint? Did it retry multple times due to a server timeout error? Do I need to set a different content-type header?
At Iron we have 3 recommended ways to debug problems you may encounter with your push queues: using IronMQ’s Error Queue feature, RequestBin, and Ngrok
Using Error Queues (IronMQ Feature)
Error queues are vastly useful to record, document, and react to retries, errors, and bugs that involve your Message queue endpoint. See our Error Queue Documentation on how to setup and read error queue messages.
Using RequestBin
RequestBin is a very useful and free service provided that helps users debug all kinds of request to a unqiuely generated endpoint.
- Step 1: go to https://requestbin.com and click on "Create a RequestBin
- Step 2: copy the unique url

- Step 3: paste it as a subscriber endpoint on your queue. This example shows us pasting it via the hud/dashboard interface but you an do the same using th raw api.

- Step 4: post a message to your push queue, return to your unique RequestBin's inspect page. Here you will be able to view and inspect your the headers and response body amongst other very useful information about your push queue's request.
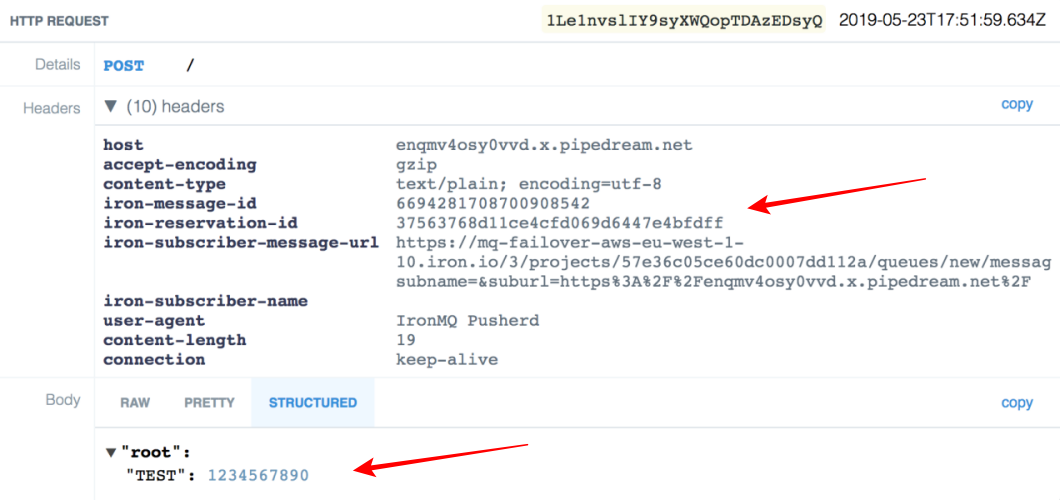
Seeing that your message was delivered successfully to a bin will easily tell you that there may be a problem with how your server is handling the message that is coming from your push queue. Often times it could be an endpoint that has not been coded to handle the post parameter's content type, endpoints that don't exist, or returning a bad response code due to internal server errors.
Testing on localhost with Ngrok
To be able to develop and test on your local machine, you’ll need to make your localhost accessible for IronMQ. This can be easily done by tunneling it to the outside world with tools such as ngrok.
- Step 1: install ngrok
- Step 2: open ngrok to your localhost's port and recieve a unique subdomain on http://XXXXX.ngrok.com or https://XXXXX.ngrok.com
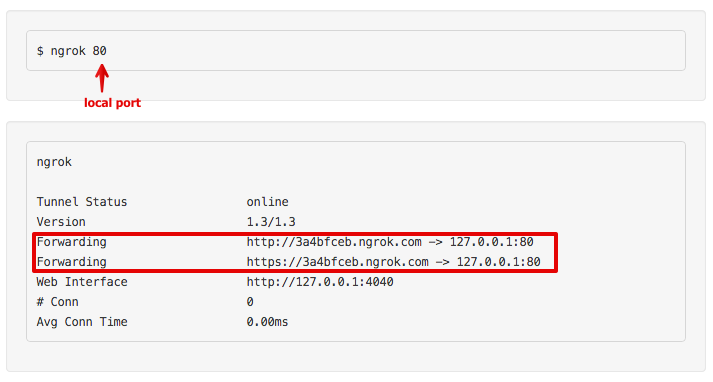
- Step 3: inspect your traffic via Ngrok's local interface at http://localhost:4040

- Last Step: debug, debug, debug! You can reply the message to your local server at which point you can debug consistantly with your favorite debugging methods, i.e print statements and runtime debuggers.